How to test big successfully
How do you test big on your website safely?
By test big I mean: having multiple changes, sometimes across multiple pages.
Testing this way is sometimes necessary (not to mention desirable), but we need to be mindful of the risk we’re taking when doing this — I’ve seen too many of these big tests fail.
Don’t get me wrong, having a test lose is not a bad outcome; however, having a test lose which also doesn’t tell us anything is the worst possible outcome for our experiments. Just so you know, an ideal experimentation process flow looks like this:
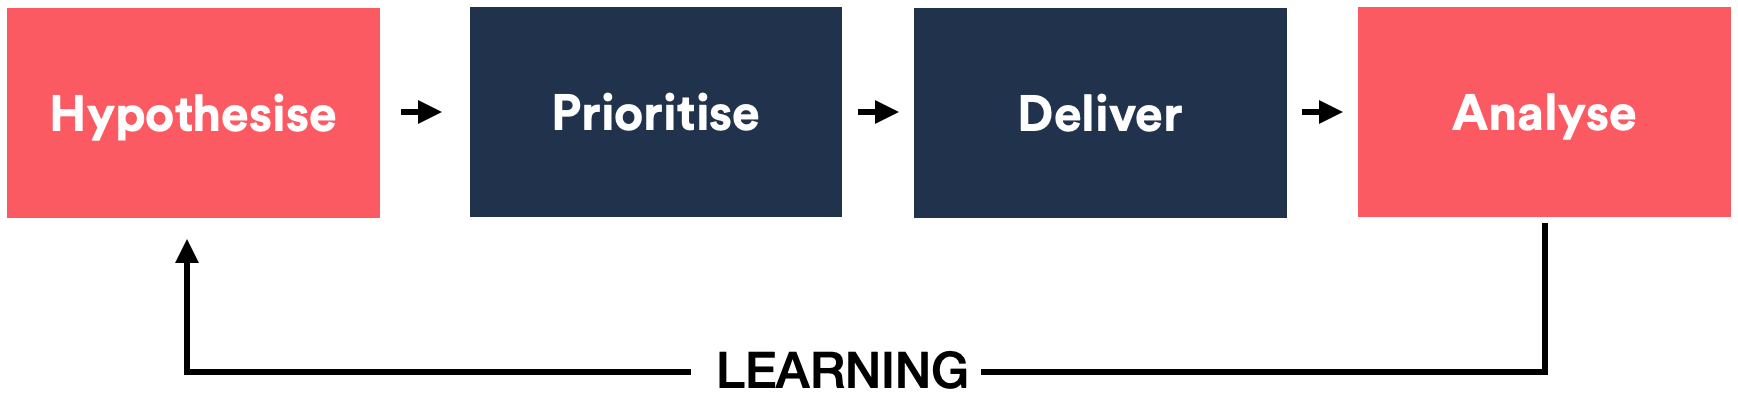
A hypothesis is prioritised and delivered, the analysis provides us with learnings which informs the next hypothesis. This learning is what closes the process loop and allows us to iterate with newer tests.
Bundling multiple changes into a single experiment can break this loop:
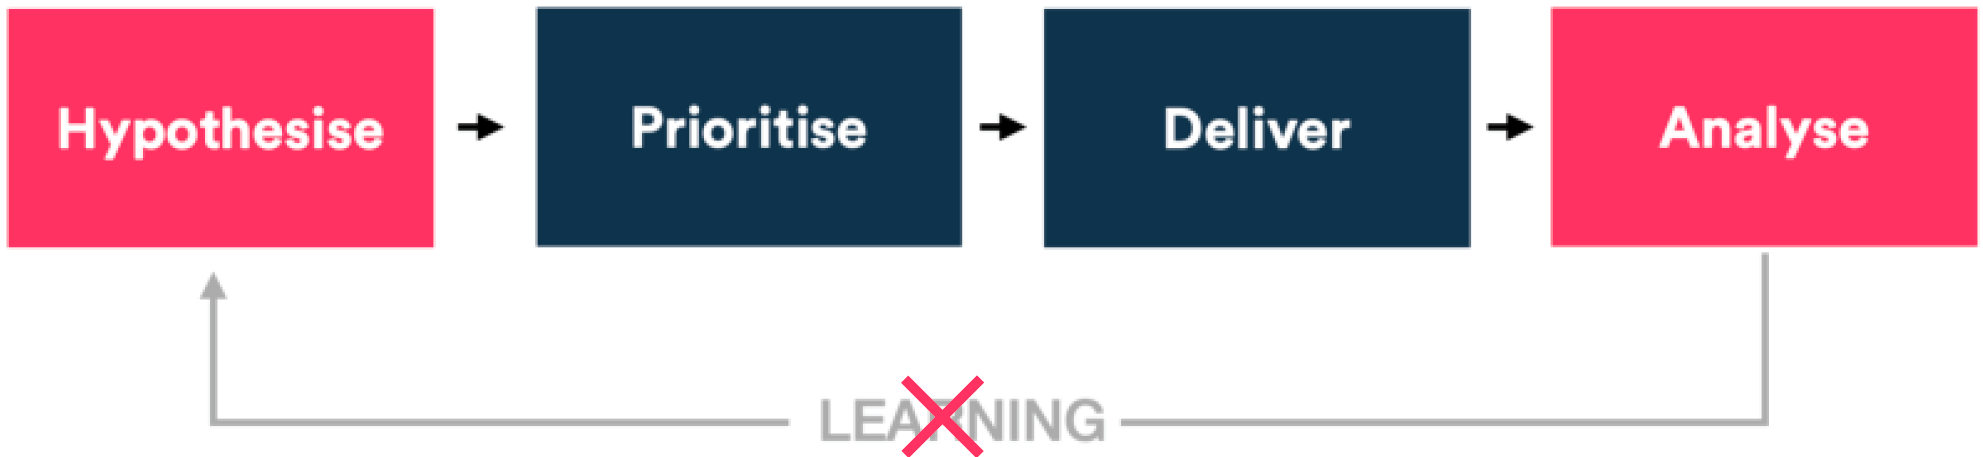
This makes the process fail. If the experiment is a win, then you might be okay not getting specific learnings, but it’s risky to assume our tests will be wins.
So what do we do? Not test big at all? Because there are some good reasons to test big, namely…
- If the main goal is to evolve the site/product rapidly
E.g. accommodate new product additions or changes. In which case, the goal is to de-risk these changes and take calculated risks in order to make larger-scale changes. - **If either traffic volumes are small, or the conversion rate is too low
**E.g. doing smaller incremental changes might not yield sufficient differences that could be seen above “statistical noise”. Big changes with the hopes of big impacts are the intention. - Perhaps the site is just in need of modernisation
In which case, small changes are too limiting when the goal is to overhaul the design/architecture of the entire site.
There may be other reasons too. The point is there may be perfectly logical and legitimate reasons to want to test big. What we need is to ensure we test in a way that allows us to learn and iterate.
With that in mind, in this article, I’ll show you how to create a hypothesis-based strategy for approaching these large-scale changes.
I’ll do this first by giving you a primer on writing a useful hypothesis, followed by some ideas to help you build your own process.
Writing a useful hypothesis
At the heart of every experiment is a hypothesis. So, it’s worth spending a bit of time here to ensure we have written one that is truly useful.
A useful hypothesis should tell us clearly what the goal of the experiment is, how this goal will be reached, and what variables involved are.
Speaking of variables, all sites are made of many of these little nuggets. A variable could be the colour of a button, some descriptive text, specific imagery or iconography, or the pricing of a product. Simply put, variables are literally anything that a user sees or experiences when using a website or app.
Let’s imagine the variables on our site are yellow blobs.

Each of those blobs is a different variable as explained above. Let’s call these types of variables independent variables.
Here’s another variable. It’s a crucial one:

The above is called a dependent variable.
The particular one I’ve illustrated is the conversion rate (that’s why it has a dollar symbol in it). I’ve used conversion as an example, but the dependent variable could be email signups or registrations or anything we define as a goal for our site. It just needs to be measurable.
It’s important to note that we can’t affect a dependent variable directly. We can only influence a dependent variable by changing one or more of the independent variables I mentioned earlier…
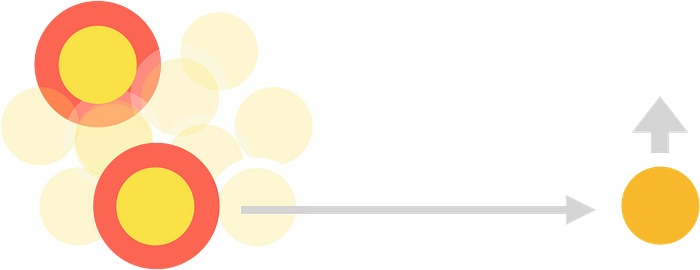
See, I made a change to one independent variable on my site, and it had a positive impact on the dependent one. I can attribute the impact to the variable I changed.
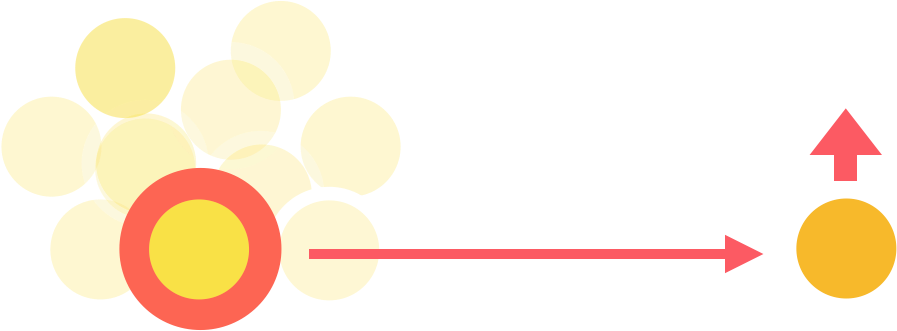
I could make multiple changes on my site…
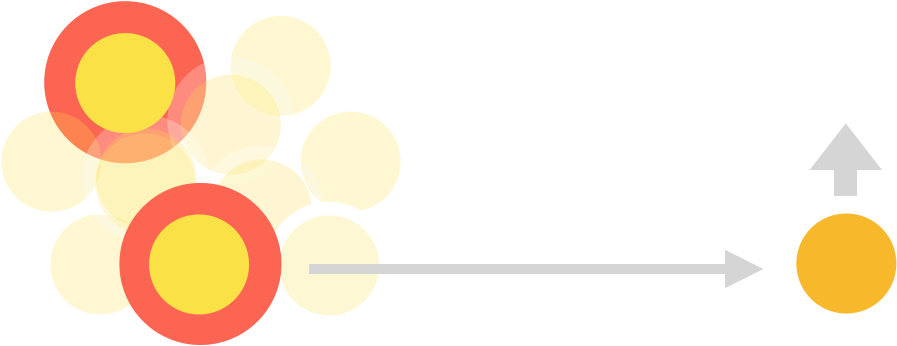
Here, I’ve bundled in two changes. I can still see a positive impact, but I can’t attribute the change to any single independent variable — perhaps both variables combined had the impact? Perhaps one had a positive impact and the other negative?
This effect is the reason why testing big is so risky.
So, when we get a proposal (perhaps in the form of designs) which come with multiple changes, it’s important to list all the variables being changed.
We can write these changes as hypotheses, describing what the assumed impact of the change is in a format like this:
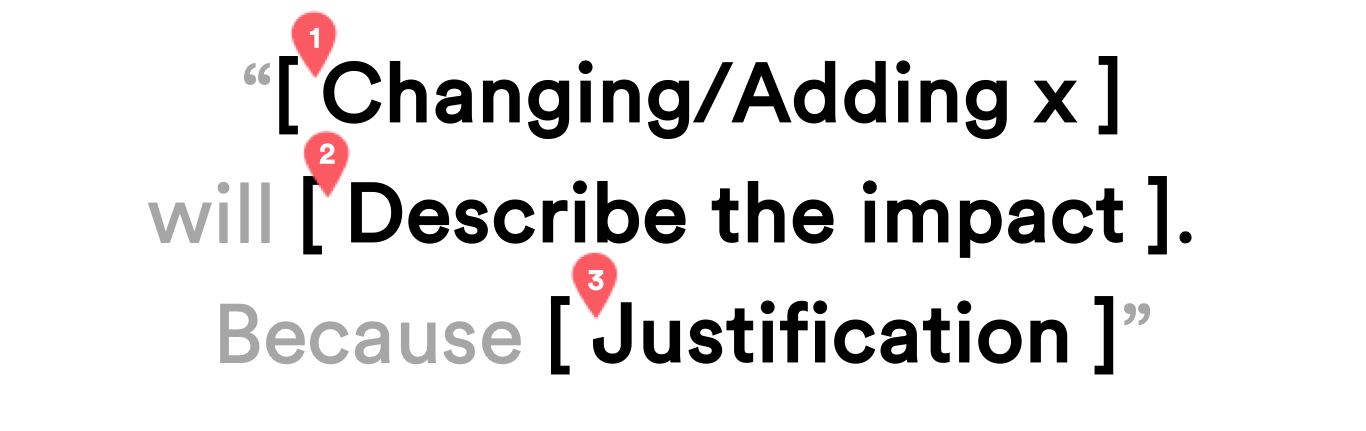 Hypothesis template
Point 1 is my independent variable, and Point 2 is the dependent variable.
I’ll cover Point 3 a little later, but first I want to provide an example of what the first part of the hypothesis statement might look like:
On the checkout page, making the pay button always appear above the fold will increase conversion.
I’ve described one variable and one change. You can add more detail to the behavioural impact if you want, I’ve just written this one quite simply.
It’s important to note that we might not be expecting a conversion win from all our hypotheses. Sometimes the goal is to de-risk a change to a particular variable. If this were the case, then the hypothesis would read…
On the checkout page, moving the terms and conditions link below the fold will not negatively impact conversion.
Now, to discuss Point 3 from the hypothesis template. It’s what I call the justification. It describes the reason why we think the assumed impact will happen.
I like to write justifications that are tied to potential conversion levers. And these conversion levers are based on common themes used by CRO teams and experts today.
Conversion levers should ideally be backed up by the results of previous experiments.
Here is a list of themes I like to use:
- Relevance
- Clarity
- Confidence
- Reduce distraction
- Reduce friction
- Urgency / Scarcity
- Social proof
- Authority
- Performance
- Value proposition
Hopefully all of the above are self-explanatory. Even so, I’ll try and do an article in the future to explain each of those in more detail. In the meantime, you can google each term to find out more.
We need to write our justifications into our hypothesis statement, for example:
On the checkout page, making the pay button always appear above the fold will increase conversion. This is because it will improve findability and clarity of the button.
Great. We need to do this for all our hypothesis statements.
Another example…
On the checkout page, listing out the products being purchased will increase conversion. This is because it will improve clarity and relevance.
As you can see above, we can use multiple levers/themes if relevant.
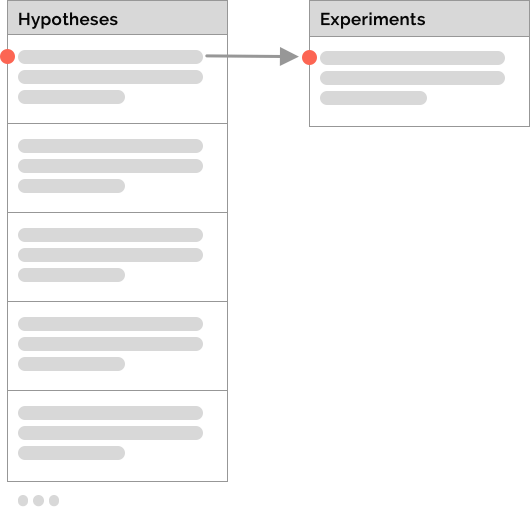
In the end, we should have a list of hypothesis statements…
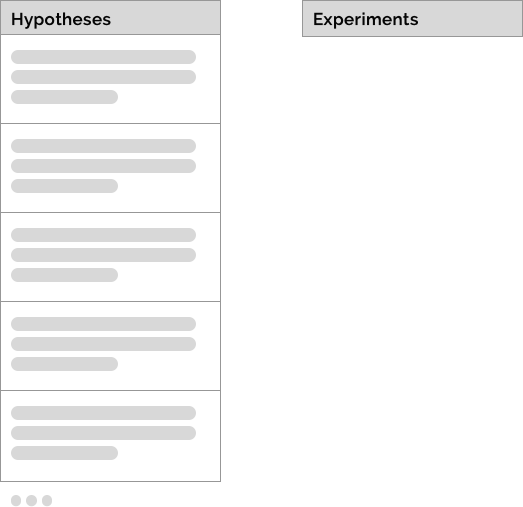 List of hypotheses and experiments
…which we want to turn into a list of experiments.
The process for bundling hypotheses
We could decide to test each hypothesis separately as individual experiments, but we’re here because we don’t want to do that. We’re here because we want to bundle changes. But we want to bundle in a way that makes sense and supports our experimental process because doing this…
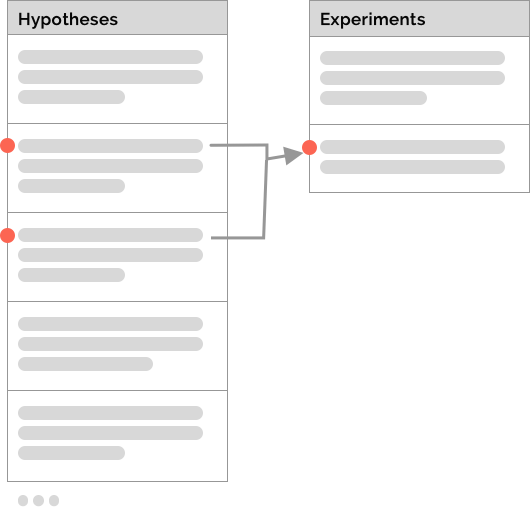 Bundling multiple hypotheses into one experiment
…means we get this:
That is, bundling changes means we only learn what the combined impact of those changes is.
We make the assumption that our first iteration of a bundled experiment will fail because this is what we’re trying to protect ourselves from. What we’re after is a process like this:
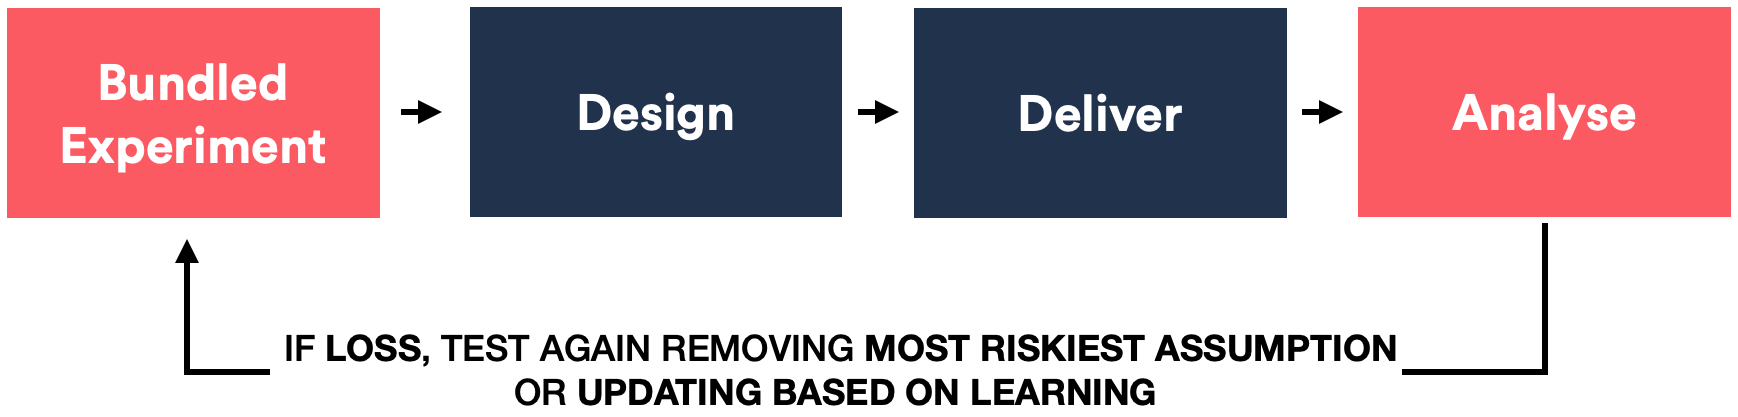
We bundle, test, then based on the result, we either remove the riskiest assumption or we update the experiment based on our learning. Then we test again.
All the while, we need to ensure we write new hypotheses for these new assumptions.
We might need to go through this process multiple times before we’ve gotten our desired result.
So how do we decide to bundle in a way that we get useful learnings? This is what the rest of this article will explore.
Preparing to bundle
We’ve done some planning already with writing our hypotheses, but we can do more to prepare:
Decide on the goals for the experimentation program
The entire process to bundle is a set of compromises based on a trade-off between learning and de-risking vs. moving fast. With that in mind, it’s important to know what the goal of your team is. This will dictate how risk-averse you get.
Where you have multiple goals, it might be useful to add weighting (like a value out of 10). This way you can have a process to help you decide when decisions get difficult.
Here’s an example:
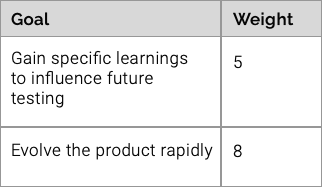 Goals are weighted out of 10
Another important decision to make is knowing whether conversion wins is a goal. It might not be. The goal might be to de-risk while evolving the product. Or perhaps it’s a mix of the two?
Writing these up and weighting them might look like this:
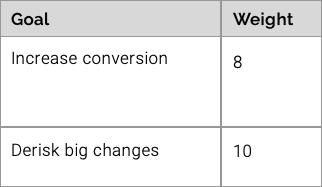 Goals are weighted out of 10
Ensure there is a good set of secondary metrics
Tracking the end goal of an experiment (eg. conversion) is a given (I hope!). Adding secondary metrics is sometimes an afterthought — or worse, ignored outright.
If there’s been a decision to bundle many changes into one or more experiments, then secondary metrics could make the difference between learning something from the experiment vs. not learning anything at all.
To decide what these secondary metrics are, visit each individual hypothesis and examine the impact on behaviour we expect. After that, decide what metrics we need to measure these impacts.
Secondary metrics when testing variables in isolation is important. Secondary metrics when bundling variables is a necessity!
Necessary bundles
We might not have a choice in bundling some changes.
Some changes will need to be tested in isolation while others may absolutely need to be bundled.
This will not always be clear-cut, but it’s useful to check these earlier rather than later to save everyone a lot of time.
Here are some ways of identifying whether some hypothesis-groupings are necessary:
Identify important hypotheses
Some hypotheses are too important to bundle. Reasons for this could be…
- The individual changes are high risk
i.e. user research sessions have flagged these variables as highly sensitive. Or perhaps previous experiments have flagged these as sensitive. Or maybe these changes just make us nervous. - **We’re curious about the impact of these changes in isolation
**This may not necessarily be because we think these could lead to experiment losses but rather this is something we really want to learn in order to drive future hypotheses or to settle an argument.
Identifying these early means we can decide whether these become isolated experiments, for example:
 Split out important hypotheses into their own separate experiments
Where it’s not clear cut, we can refer to our experiment program goal we defined earlier to help us decide.
Impose limits on the number of changes to bundle
It may be useful to impose a limit on the number of changes to bundle together. This limit does not need to be based only on the number of changes — it could also incorporate development time and effort.
Also, this limit doesn’t need to be adhered to strictly. It’s rather a guideline to help us contain the “size” of our experiments. For example, we might want to limit experiments to three or four changes.
Again, the experimentation program goal may help dictate what these limits look like. Just bear in mind that the more changes we group, the higher the risk we take on.
Identify dependencies
Some changes may be dependant on others in order to work. This might either be from a design perspective or a development one.
For example, we might wish to create a summary part of the checkout screen and perhaps there are other changes which rely on this.
Having dependencies doesn’t necessarily mean the changes definitely need to be bundled together. We have the option to run one experiment after another (serialising the experiments). That’s if we have the time.
It’s just useful to call them out at this early stage if we spot them.
Identify changes which are hard to separate
It may be tricky from a development perspective to split out certain changes.
For this, it’s important to have a frank and honest discussion so as to weigh up any additional development time vs. the risk of bundling changes.
Bear in mind that we might ultimately have to split them out if the evidence points to one of these causing a negative impact on the test. In this case, gathering as much data as we can help support this decision.
If no data exists, then consider adding the secondary metrics or run an A/A experiment with the sole purpose of collecting these secondary metrics.
“Decided” bundles
Now that we’ve hopefully taken care of the changes we might not have control over, we can tackle changes which we do have control of. Let’s explore some ways to help develop our list of experiments…
Identify changes which can be done and rolled out rapidly
Not all changes are equal in terms of development time. Some changes may take a long time to do, while others might be super quick.
Wouldn’t it be nice to have some experiments running and collecting data while the more development-heavy changes are being worked on?
A developer could advise what these easy wins are.
We may have to sacrifice a little in terms of the design if there are items not designed to be tested in isolation, but it still might be valuable to get some data around some hypotheses.
Follow up experiments could refine these changes further.
Use the justification
Since we’ve added justifications to our hypotheses, we can combine the changes based on the similar justifications.
For example, we might have a number of changes to our UI for the sole purpose of clarity. Bundling these hypotheses means we get to learn if our view of clarity matches the users.
We can also review the themes to determine if there are any we want to test separately. For example, if we are planning a whole stream of urgency messaging, then it might make sense to defer any hypotheses that feature that theme.
We can plan an entire experiment backlog using themes. For instance, we might decide to focus a quarter on just clarity if that is a business focus of ours. Or we could decide to test a wide number of themes.
Themes and justification are very powerful lenses through which to review our hypotheses.
Bundle based on the experiment goal
We’ve already identified that we need a goal for our entire experimentation program, but it is equally important to have a goal for each experiment that we want to run.
Thankfully the goals are written into each of the hypotheses we’ve written.
For example, we might not expect conversion wins from all of the hypotheses. These changes could exist because they enable subsequent experiments. For example, simple style changes: if these are seen as low risk, it might make sense to group a bunch of them together.
Recognise when to MVT (if at all)
Some of you were probably waiting for this to be raised. You see, it is possible to test multiple variables with a Multivariate test (MVT for short).
What this means is we have a single experiment with multiple variations. Each variable would be tested in isolation. A variation would also exist for each permutation of changes.
Below is an example of an MVT.
 Exampe MVT
In the above example, we have two variables we’d like to test. So, we have two variation groups isolating each variable. And we have one variation group combining the two changes.
The more variables we have the more of these “combination” variations we need. This means that the number of variations can quickly get out of hand if testing more than two variables.
It’s worth noting that we have the option to remove certain variations, such as the example below:
 Example Factorial Test
When we are selective with the combination groups in this way, these tests are no longer MVTs. They are now Factorial tests.
MVT tests every combination of variables. Factorial tests are more selective.
On the face of it, MVTs or Factorials are perfect, allowing us to move fast while providing us with specific learnings. However, it’s important to note the drawbacks, namely:
- We’ll need to run the experiment for longer as we increase the number of variations, therefore dividing the traffic. We also need to ensure we have a good mix of the users in our variations.
- We face the risk of hitting the multiple comparisons problem — this is where we increase your likelihood of a false positive/negative. This means we’ll need to compensate by accepting a “higher bar” of statistical significance.
The key point about MVT and Factorial experiments is that we need a lot of traffic and conversions for our experiment before we can even consider this as an option. Not all of us have all that traffic.
It’s also worth noting that MVT/Factorials may not even buy us more time in the first place!
Consider the following diagram, put together based on calculated test runtimes for an MVT vs. a typical bundled A/B test. Note that the variables being tested are the same in the bundled and MVT/Factorial.
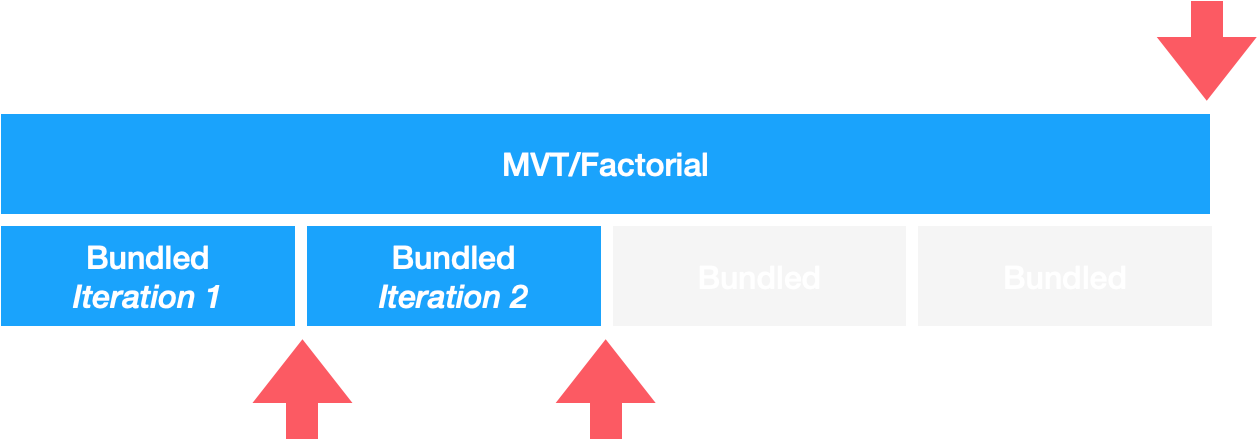 MVT/Factorials vs. iterations of bundled experiments
What this tells us is that assuming you have good rules for ending a bundled A/B test, you have a greater chance to progress faster than you do with running a single MVT/Factorial test.
This is particularly the case if a bundled A/B test is successful within a couple of iterations.
Now obviously, the above chart will look different depending on the traffic volumes, conversion rates etc. But it is worth keeping in mind that it’s not always the case that MVT/Factorials will give you an answer sooner.
In the end, there’s no right or wrong answer to this. An MVT or Factorial experiment may be the perfect experiment build type for some cases. It’s just important not to make any assumptions here.
Decide what tests you can run in parallel
Finally, once we’ve got a list of all our experiments. We can decide which tests we want to run in parallel. It doesn’t matter if we’re not overlaying our experiments.
We can still review the experiments, for the changes. If the hypotheses don’t clash with each other — i.e. the variables don’t overlap, then it might be okay to overlay experiments.
We can also review our justifications, noting the themes that the experiments refer to. If the themes don’t clash, then it might be okay to overlay.
Notice that I say “might be okay to overlay” for both of the above? This is because we still need to look out for extreme interaction effects between experiments to ensure we don’t get any unwanted clashes.
To check for extreme interaction effects, list all the permutations of the variation groups of all the experiments that will be overlayed. Then check if there are variation group combinations which you think could have a severe negative impact on behaviour.
One example might be if a page becomes overly complicated for a specific variation combination. It still might not be enough to not overlay, but it is something to highlight before test-launch to see if we can de-risk further.
Conclusion
In this article, we’ve explored a way of writing useful hypotheses. We’ve also explored a means of using these hypotheses to help us build more robust experiments.
It’s worth mentioning that there’s no right or wrong answer to any of this. There’s just a trade-off, balancing learning and de-risking vs. moving fast. In order to make those trade-offs, we need some guidance so we can be risk-averse with a degree of safety.
It’s also worth mentioning, that even going through the exercises above, there is no guarantee that we won’t get the odd experiment that we can’t learn from. But hopefully, these should be fewer and more far between than not employing any sort of tactics.
Hope this helps you all! Happy experimenting!